Document Properties: Setting the Sensitivity Label
Sensitivity Labels are a property that can be added to an Office 365 document to indicate that it is compliant with a company's information protection policies. Sensitivity Labels have designations like "Confidential", "Internal use only", or "Public" depending on the policies implemented by the company. They are generally only enabled for enterprise versions of Office.
See the following Microsoft documentation on how to Apply sensitivity labels to your files and email.
Sensitivity Labels are generally stored as custom document properties so they
can be enabled using DocProperties::set_custom_property(). However, since
the metadata differs from company to company you will need to extract some of
the required metadata from sample files.
The first step is to create a new file in Excel and set a non-encrypted
sensitivity label. Then unzip the file by changing the extension from .xlsx to
.zip or by using a command line utility like this:
$ unzip myfile.xlsx -d myfile
Archive:  myfile.xlsx
  inflating: myfile/[Content_Types].xml
  inflating: myfile/docProps/app.xml
  inflating: myfile/docProps/custom.xml
  inflating: myfile/docProps/core.xml
  inflating: myfile/_rels/.rels
  inflating: myfile/xl/workbook.xml
  inflating: myfile/xl/worksheets/sheet1.xml
  inflating: myfile/xl/styles.xml
  inflating: myfile/xl/theme/theme1.xml
  inflating: myfile/xl/_rels/workbook.xml.rels
Then examine the docProps/custom.xml file from the unzipped xlsx file. The
file doesn't contain newlines so it is best to view it in an editor that can
handle XML or use a commandline utility like libxml’s xmllint to format the
XML for clarity:
$ xmllint --format myfile/docProps/custom.xml
<?xml version="1.0" encoding="UTF-8" standalone="yes"?>
<Properties
    xmlns="http://schemas.openxmlformats.org/officeDocument/2006/custom-properties"
    xmlns:vt="http://schemas.openxmlformats.org/officeDocument/2006/docPropsVTypes">
  <property fmtid="{D5CDD505-2E9C-101B-9397-08002B2CF9AE}"
            pid="2"
            name="MSIP_Label_2096f6a2-d2f7-48be-b329-b73aaa526e5d_Enabled">
    <vt:lpwstr>true</vt:lpwstr>
  </property>
  <property fmtid="{D5CDD505-2E9C-101B-9397-08002B2CF9AE}"
            pid="3"
            name="MSIP_Label_2096f6a2-d2f7-48be-b329-b73aaa526e5d_SetDate">
    <vt:lpwstr>2024-01-01T12:00:00Z</vt:lpwstr>
  </property>
  <property fmtid="{D5CDD505-2E9C-101B-9397-08002B2CF9AE}"
            pid="4"
            name="MSIP_Label_2096f6a2-d2f7-48be-b329-b73aaa526e5d_Method">
    <vt:lpwstr>Privileged</vt:lpwstr>
  </property>
  <property fmtid="{D5CDD505-2E9C-101B-9397-08002B2CF9AE}"
            pid="5"
            name="MSIP_Label_2096f6a2-d2f7-48be-b329-b73aaa526e5d_Name">
    <vt:lpwstr>Confidential</vt:lpwstr>
  </property>
  <property fmtid="{D5CDD505-2E9C-101B-9397-08002B2CF9AE}"
            pid="6"
            name="MSIP_Label_2096f6a2-d2f7-48be-b329-b73aaa526e5d_SiteId">
    <vt:lpwstr>cb46c030-1825-4e81-a295-151c039dbf02</vt:lpwstr>
  </property>
  <property fmtid="{D5CDD505-2E9C-101B-9397-08002B2CF9AE}"
            pid="7"
            name="MSIP_Label_2096f6a2-d2f7-48be-b329-b73aaa526e5d_ActionId">
    <vt:lpwstr>88124cf5-1340-457d-90e1-0000a9427c99</vt:lpwstr>
  </property>
  <property fmtid="{D5CDD505-2E9C-101B-9397-08002B2CF9AE}"
            pid="8"
            name="MSIP_Label_2096f6a2-d2f7-48be-b329-b73aaa526e5d_ContentBits">
    <vt:lpwstr>2</vt:lpwstr>
  </property>
</Properties>
The MSIP (Microsoft Information Protection) labels in the name attributes
contain a GUID that is unique to each company. The SiteId field will also be
unique to your company/location. The meaning of each of these fields is
explained in the the following Microsoft document on Microsoft Information
Protection SDK - Metadata. Once you have identified the necessary metadata you
can add it to a new document as shown below.
Note, some sensitivity labels require that the document is encrypted. In order to extract the required metadata you will need to unencrypt the file which may remove the sensitivity label. In that case you may need to use a third party tool such as msoffice-crypt.
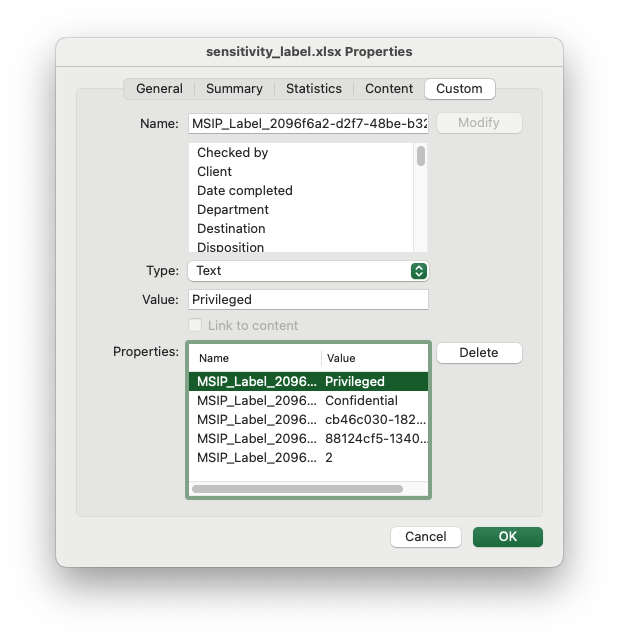
Image of the output file:
Code to generate the output file:
// SPDX-License-Identifier: MIT OR Apache-2.0
//
// Copyright 2022-2026, John McNamara, jmcnamara@cpan.org

//! An example adding a Sensitivity Label to an Excel file using custom document
//! properties. See the main docs for an explanation of how to extract the
//! metadata.

use rust_xlsxwriter::{DocProperties, Workbook, XlsxError};

fn main() -> Result<(), XlsxError> {
    let mut workbook = Workbook::new();

    // Metadata extracted from a company specific file.
    let site_id = "cb46c030-1825-4e81-a295-151c039dbf02";
    let action_id = "88124cf5-1340-457d-90e1-0000a9427c99";
    let company_guid = "2096f6a2-d2f7-48be-b329-b73aaa526e5d";

    // Add the document properties. Note that these should all be in text format.
    let properties = DocProperties::new()
        .set_custom_property(format!("MSIP_Label_{company_guid}_Method"), "Privileged")
        .set_custom_property(format!("MSIP_Label_{company_guid}_Name"), "Confidential")
        .set_custom_property(format!("MSIP_Label_{company_guid}_SiteId"), site_id)
        .set_custom_property(format!("MSIP_Label_{company_guid}_ActionId"), action_id)
        .set_custom_property(format!("MSIP_Label_{company_guid}_ContentBits"), "2");

    workbook.set_properties(&properties);

    workbook.save("sensitivity_label.xlsx")?;

    Ok(())
}