Adding dates and more formatting
Let's extend the program a little bit more to add some dates to the data:
// SPDX-License-Identifier: MIT OR Apache-2.0
//
// Copyright 2022-2026, John McNamara, jmcnamara@cpan.org

//! A simple program to write some data to an Excel spreadsheet using
//! `rust_xlsxwriter`. Part 3 of a tutorial.

use rust_xlsxwriter::{ExcelDateTime, Format, Formula, Workbook, XlsxError};

fn main() -> Result<(), XlsxError> {
    // Some sample data we want to write to a spreadsheet.
    let expenses = vec![
        ("Rent", 2000, "2022-09-01"),
        ("Gas", 200, "2022-09-05"),
        ("Food", 500, "2022-09-21"),
        ("Gym", 100, "2022-09-28"),
    ];

    // Create a new Excel file object.
    let mut workbook = Workbook::new();

    // Add a bold format to use to highlight cells.
    let bold = Format::new().set_bold();

    // Add a number format for cells with money values.
    let money_format = Format::new().set_num_format("$#,##0");

    // Add a number format for cells with dates.
    let date_format = Format::new().set_num_format("d mmm yyyy");

    // Add a worksheet to the workbook.
    let worksheet = workbook.add_worksheet();

    // Write some column headers.
    worksheet.write_with_format(0, 0, "Item", &bold)?;
    worksheet.write_with_format(0, 1, "Cost", &bold)?;
    worksheet.write_with_format(0, 2, "Date", &bold)?;

    // Adjust the date column width for clarity.
    worksheet.set_column_width(2, 15)?;

    // Iterate over the data and write it out row by row.
    let mut row = 1;
    for expense in &expenses {
        worksheet.write(row, 0, expense.0)?;
        worksheet.write_with_format(row, 1, expense.1, &money_format)?;

        let date = ExcelDateTime::parse_from_str(expense.2)?;
        worksheet.write_with_format(row, 2, &date, &date_format)?;

        row += 1;
    }

    // Write a total using a formula.
    worksheet.write_with_format(row, 0, "Total", &bold)?;
    worksheet.write_with_format(row, 1, Formula::new("=SUM(B2:B5)"), &money_format)?;

    // Save the file to disk.
    workbook.save("tutorial3.xlsx")?;

    Ok(())
}
The corresponding spreadsheet will look like this:
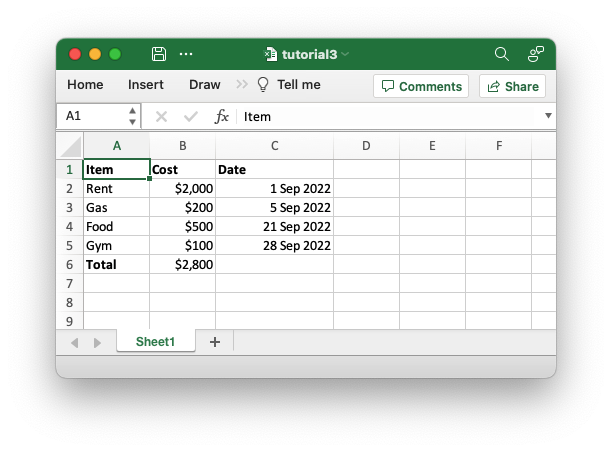
The differences here are that we have added a "Date" column with formatting and made that column a little wider to accommodate the dates.
To do this we can extend our program as follows:
// SPDX-License-Identifier: MIT OR Apache-2.0
//
// Copyright 2022-2026, John McNamara, jmcnamara@cpan.org

//! A simple program to write some data to an Excel spreadsheet using
//! `rust_xlsxwriter`. Part 3 of a tutorial.

use rust_xlsxwriter::{ExcelDateTime, Format, Formula, Workbook, XlsxError};

fn main() -> Result<(), XlsxError> {
    // Some sample data we want to write to a spreadsheet.
    let expenses = vec![
        ("Rent", 2000, "2022-09-01"),
        ("Gas", 200, "2022-09-05"),
        ("Food", 500, "2022-09-21"),
        ("Gym", 100, "2022-09-28"),
    ];

    // Create a new Excel file object.
    let mut workbook = Workbook::new();

    // Add a bold format to use to highlight cells.
    let bold = Format::new().set_bold();

    // Add a number format for cells with money values.
    let money_format = Format::new().set_num_format("$#,##0");

    // Add a number format for cells with dates.
    let date_format = Format::new().set_num_format("d mmm yyyy");

    // Add a worksheet to the workbook.
    let worksheet = workbook.add_worksheet();

    // Write some column headers.
    worksheet.write_with_format(0, 0, "Item", &bold)?;
    worksheet.write_with_format(0, 1, "Cost", &bold)?;
    worksheet.write_with_format(0, 2, "Date", &bold)?;

    // Adjust the date column width for clarity.
    worksheet.set_column_width(2, 15)?;

    // Iterate over the data and write it out row by row.
    let mut row = 1;
    for expense in &expenses {
        worksheet.write(row, 0, expense.0)?;
        worksheet.write_with_format(row, 1, expense.1, &money_format)?;

        let date = ExcelDateTime::parse_from_str(expense.2)?;
        worksheet.write_with_format(row, 2, &date, &date_format)?;

        row += 1;
    }

    // Write a total using a formula.
    worksheet.write_with_format(row, 0, "Total", &bold)?;
    worksheet.write_with_format(row, 1, Formula::new("=SUM(B2:B5)"), &money_format)?;

    // Save the file to disk.
    workbook.save("tutorial3.xlsx")?;

    Ok(())
}
Dates and times in Excel are floating point numbers that have a format applied
to display them in the desired way. In order to handle dates and times with
rust_xlsxwriter we create them using a ExcelDateTime instance and format
them with an Excel number format.
Reading ahead:
If you enable the
chronofeature inrust_xlsxwriteryou can also usechrono::NaiveDateTime,chrono::NaiveDateorchrono::NaiveTimeinstances.
In the example above we create the ExcelDateTime instance from the date
strings in our input data and then add a number format it so that it appears
correctly in Excel:
// SPDX-License-Identifier: MIT OR Apache-2.0
//
// Copyright 2022-2026, John McNamara, jmcnamara@cpan.org

//! A simple program to write some data to an Excel spreadsheet using
//! `rust_xlsxwriter`. Part 3 of a tutorial.

use rust_xlsxwriter::{ExcelDateTime, Format, Formula, Workbook, XlsxError};

fn main() -> Result<(), XlsxError> {
    // Some sample data we want to write to a spreadsheet.
    let expenses = vec![
        ("Rent", 2000, "2022-09-01"),
        ("Gas", 200, "2022-09-05"),
        ("Food", 500, "2022-09-21"),
        ("Gym", 100, "2022-09-28"),
    ];

    // Create a new Excel file object.
    let mut workbook = Workbook::new();

    // Add a bold format to use to highlight cells.
    let bold = Format::new().set_bold();

    // Add a number format for cells with money values.
    let money_format = Format::new().set_num_format("$#,##0");

    // Add a number format for cells with dates.
    let date_format = Format::new().set_num_format("d mmm yyyy");

    // Add a worksheet to the workbook.
    let worksheet = workbook.add_worksheet();

    // Write some column headers.
    worksheet.write_with_format(0, 0, "Item", &bold)?;
    worksheet.write_with_format(0, 1, "Cost", &bold)?;
    worksheet.write_with_format(0, 2, "Date", &bold)?;

    // Adjust the date column width for clarity.
    worksheet.set_column_width(2, 15)?;

    // Iterate over the data and write it out row by row.
    let mut row = 1;
    for expense in &expenses {
        worksheet.write(row, 0, expense.0)?;
        worksheet.write_with_format(row, 1, expense.1, &money_format)?;

        let date = ExcelDateTime::parse_from_str(expense.2)?;
        worksheet.write_with_format(row, 2, &date, &date_format)?;

        row += 1;
    }

    // Write a total using a formula.
    worksheet.write_with_format(row, 0, "Total", &bold)?;
    worksheet.write_with_format(row, 1, Formula::new("=SUM(B2:B5)"), &money_format)?;

    // Save the file to disk.
    workbook.save("tutorial3.xlsx")?;

    Ok(())
}
Another addition to our program is the make the "Date" column wider for clarity
using the Worksheet::set_column_width() method.