Working with Custom UI elements/Ribbons
This section explains how to add custom UI elements to the Excel Ribbon interface.
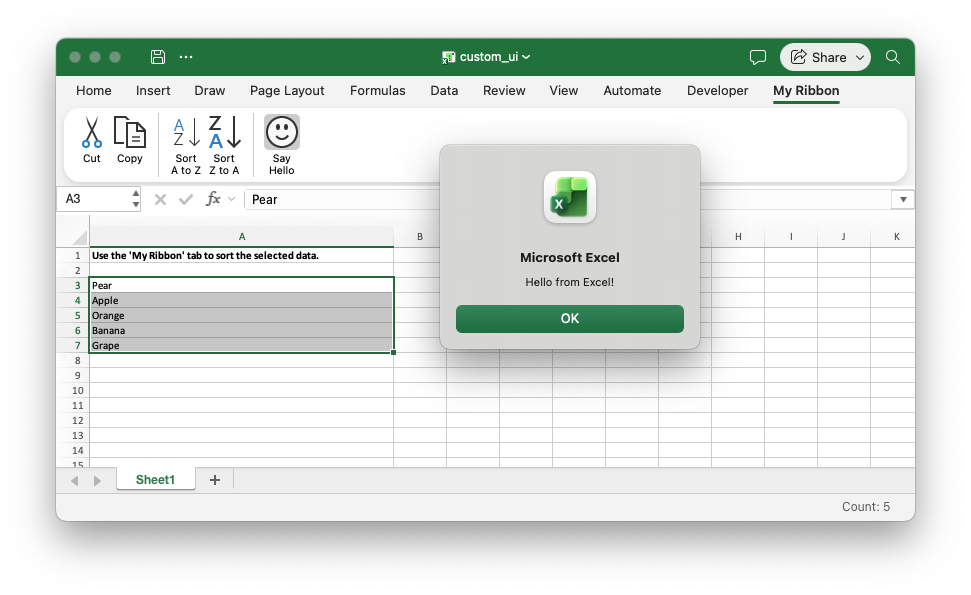
The code to produce the example above is shown below. The Cut, Copy and Sort
commands are defined in the customUI14.xml file. The "Say Hello" button is
also defined in the XML file but the macro is contained in the
vbaProject_custom_ui.bin file:
use rust_xlsxwriter::{Format, Workbook, XlsxError};

fn main() -> Result<(), XlsxError> {
    // Create a new Excel file object.
    let mut workbook = Workbook::new();

    // Add the Custom UI XML file for the Excel 2010+ ribbon.
    workbook.add_custom_ui("examples/customUI14.xml")?;

    // Add the VBA project for the macro on the custom ribbon tab. This was
    // extracted from an Excel file using the vba_extract utility.
    workbook.add_vba_project("examples/vbaProject_custom_ui.bin")?;

    // Add a worksheet.
    let worksheet = workbook.add_worksheet();

    // Widen the first column for clarity.
    worksheet.set_column_width(0, 50)?;

    // Show some instructions for the end user.
    let bold = Format::new().set_bold();
    let message = "Use the 'My Ribbon' tab to sort the selected data.";
    worksheet.write_with_format(0, 0, message, &bold)?;

    // Add some data to sort.
    let fruits = ["Pear", "Apple", "Orange", "Banana", "Grape"];
    worksheet.write_column(2, 0, fruits)?;

    // Preselect the data so it is ready to sort.
    worksheet.set_selection(2, 0, 6, 0)?;

    // Save the file to disk. Note the `.xlsm` extension. This is required by
    // Excel for files with VBA macros or it will raise a warning.
    workbook.save("custom_ui.xlsm")?;

    Ok(())
}
The Excel Custom UI format
Excel, and other Office applications, allow you to modify the Ribbon interface via custom XML files. These files are defined as Custom UI XML using the Ribbon schema and are embedded within the Excel file. These files enable customization of the Ribbon interface with specific tabs, groups, buttons, dropdowns, and other controls, including controls that run VBA macros.
Creating Custom UI XML files
The easiest way to create Custom UI XML is with the Office RibbonX Editor. It
can add Custom UI parts to an Excel file and provides templates, syntax
highlighting and schema validation. Once the ribbon works in Excel, save the XML
from the editor as a file to use with Workbook::add_custom_ui().
If you already have an Excel file with a custom ribbon, the XML can be extracted
from it. Excel files are zip files and the Custom UI parts are stored as
customUI/customUI.xml and customUI/customUI14.xml.
Excel 2007 and Excel 2010+ formats
Excel supports two Ribbon schemas which are identified by the namespace of the
customUI element:
- Excel 2007 format:
http://schemas.microsoft.com/office/2006/01/customui - Excel 2010+ format:
http://schemas.microsoft.com/office/2009/07/customui
The Ribbon XML is the same in both formats apart from the namespace. However,
the Excel 2010+ format also supports customizing the Backstage view (the File
menu), via a backstage element, and right-click context menus, via a
contextMenus element.
Excel uses the formats as follows:
- An Excel 2007 format file is used by all versions of Excel from Excel 2007 onwards.
- An Excel 2010+ format file is used by Excel 2010 and later and is ignored by Excel 2007.
- If both are present, Excel 2007 uses the Excel 2007 format file and Excel 2010 and later use the Excel 2010+ format file.
In practice, the Excel 2010+ format on its own is sufficient unless the file needs to work in Excel 2007.
Adding Custom UI elements in rust_xlsxwriter
The Workbook::add_custom_ui() method is used to add the Custom UI XML files
to modify the Ribbon in an Excel file:
// SPDX-License-Identifier: MIT OR Apache-2.0
//
// Copyright 2022-2026, John McNamara, jmcnamara@cpan.org

//! An example of adding a Custom UI XML file to modify the Ribbon in an Excel
//! file.

use rust_xlsxwriter::{Workbook, XlsxError};

fn main() -> Result<(), XlsxError> {
    let mut workbook = Workbook::new();

    workbook.add_custom_ui("examples/customUI14.xml")?;

    Ok(())
}
The method can be called twice to add both Ribbon schema versions discussed above:
// SPDX-License-Identifier: MIT OR Apache-2.0
//
// Copyright 2022-2026, John McNamara, jmcnamara@cpan.org

//! An example of adding both the Excel 2007 and the Excel 2010+ format Custom
//! UI XML files to a workbook.

use rust_xlsxwriter::{Workbook, XlsxError};

fn main() -> Result<(), XlsxError> {
    let mut workbook = Workbook::new();

    // Add an Excel 2007 format ribbon.
    workbook.add_custom_ui("examples/customUI.xml")?;

    // Add an Excel 2010+ format ribbon.
    workbook.add_custom_ui("examples/customUI14.xml")?;

    Ok(())
}
If the input XML file can't be read, an XlsxError::IoError error is
returned. If the file doesn't have a customUI root element with a recognized
namespace, or has the same schema version as a previously added file, an
XlsxError::CustomUiError error is returned.
Note, rust_xlsxwriter only checks the root element of the XML file. It doesn't check that the XML is well-formed or valid. Excel ignores Custom UI files with errors, without a warning, so users should verify the XML in Office RibbonX Editor or check that the ribbon is displayed as expected when the file is opened in Excel.
The Custom UI XML structure
A Custom UI file has a customUI root element that contains a ribbon element.
The ribbon contains tabs, each tab contains one or more group elements,
and each group contains controls such as button, toggleButton, checkBox,
dropDown, menu or separator.
This is the XML file used to create the "My Ribbon" tab shown at the top of this page:
<customUI xmlns="http://schemas.microsoft.com/office/2009/07/customui">
  <ribbon>
    <tabs>
      <tab id="customTab" label="My Ribbon">
        <group id="clipboardGroup" label="Clipboard">
          <button idMso="Cut" size="large"/>
          <button idMso="Copy" size="large"/>
        </group>
        <group id="sortGroup" label="Sort">
          <button idMso="SortAscendingExcel" size="large"/>
          <button idMso="SortDescendingExcel" size="large"/>
        </group>
        <group id="macroGroup" label="Macros">
          <button id="sayHelloButton" label="Say Hello" imageMso="HappyFace"
                  size="large" onAction="say_hello_callback"/>
        </group>
      </tab>
    </tabs>
  </ribbon>
</customUI>
The most commonly used attributes are:
-
id: A unique identifier for a custom tab, group or control. -
idMso: Refers to a built-in Excel tab, group or control instead of a custom one. For example<button idMso="Copy"/>adds Excel's own Copy button to a group, and<tab idMso="TabHome">can be used to add a custom group to the existing Home tab. -
label: The text shown for the tab, group or control. -
imageMso: The name of a built-in Office icon to use for a custom control. -
size: The control size,"normal"or"large". -
screentipandsupertip: The tooltip title and description. -
onAction: The VBA procedure to run when the control is clicked. See Integration with VBA projects below.
The best way to work with this format is to use the Office RibbonX Editor discussed above.
The names of the built-in controls and tabs that can be used with idMso are
listed in Microsoft's Office Fluent UI command identifiers. The easiest way to
find the name of a single control, in Excel for Windows, is to hover over it in
the "Customize the Ribbon" dialog, where the name is shown in brackets in the
tooltip.
Integration with VBA projects
Custom UI elements that reuse built-in Excel commands, via idMso, can be
completely defined in the Custom UI XML. The Cut, Copy and Sort buttons in the
example above are built-in commands of this kind.
Custom UI elements that provide additional functionality typically require VBA
code. The onAction callbacks referenced in the XML must be implemented as VBA
procedures that take an IRibbonControl parameter. For example, the "Say Hello"
button in the XML above has onAction="say_hello_callback", which is
implemented in the example's VBA project as:
Sub say_hello_callback(control As IRibbonControl)
    say_hello
End Sub

Sub say_hello()
    MsgBox "Hello from Excel!"
End Sub
A procedure without the IRibbonControl parameter, such as say_hello() above
or a macro written for a worksheet button, can't be used directly as a callback.
Excel shows a "Wrong number of arguments" error when the control is clicked.
Instead, as in the example, call the existing macro from a callback.
When combining Custom UI with VBA, use both Workbook::add_custom_ui() and
Workbook::add_vba_project():
// SPDX-License-Identifier: MIT OR Apache-2.0
//
// Copyright 2022-2026, John McNamara, jmcnamara@cpan.org

//! An example of adding a custom ribbon tab to a workbook using a Custom UI XML
//! file. The tab contains a button that runs a macro from a VBA project.

use rust_xlsxwriter::{Workbook, XlsxError};

fn main() -> Result<(), XlsxError> {
    let mut workbook = Workbook::new();

    // Add the Custom UI XML file for the Excel 2010+ ribbon.
    workbook.add_custom_ui("examples/customUI14.xml")?;

    // Add the VBA project with the macro used by the ribbon button.
    workbook.add_vba_project("examples/vbaProject_custom_ui.bin")?;

    let worksheet = workbook.add_worksheet();
    worksheet.write(0, 0, "Use the 'My Ribbon' tab.")?;

    // Note the `.xlsm` extension, which is required for VBA macros.
    workbook.save("custom_ui.xlsm")?;

    Ok(())
}
See Working with Macros for details on extracting and adding a VBA project.
Excel files that contain Custom UI elements must use an xlsm extension when
they also include VBA code but can use xlsx for Custom UI without macros.
Microsoft documentation
For more information on the Custom UI XML see the following Microsoft documentation:
-
Customize the Office Fluent ribbon by using an Open XML formats file. A short introduction to adding a custom ribbon to a file.
-
Customizing the 2007 Office Fluent Ribbon for Developers. A detailed guide to the ribbon elements, attributes and VBA callbacks. It dates from Excel 2007 but still applies to current versions.
-
Targeting User Interface Solutions to the 2007 and 2010 Releases of Microsoft Office. Explains the differences between the Excel 2007 and Excel 2010+ formats.
-
[MS-CUSTOMUI2]: Custom UI XML Markup Version 2 Specification. The formal specification of the Excel 2010+ format.